The Samples panel is the place to provide sample text to base your regular expression on, and to test the regular expression against. Together, the Samples, Match, and Action panels define a RegexMagic formula to generate a regular expression, and possibly a replacement text.
In the default layout, the Samples panel shares the top left tab with the Match and Action panels. In all other layouts, the Samples panel has it own space in the top left corner of RegexMagic’s window. All layouts allow you to have the Samples panel visible when working with the Match and Action panels, which is a must. You’ll want to reference your sample text while defining the patterns to match it.
Press Alt+2 on the keyboard to move keyboard focus to the Samples panel, and to make it visible if it was hidden. Or, select the Samples item in the View menu. You can access that menu by the View button on the Assistant panel, and by right-clicking on the caption or tab of any panel in RegexMagic.
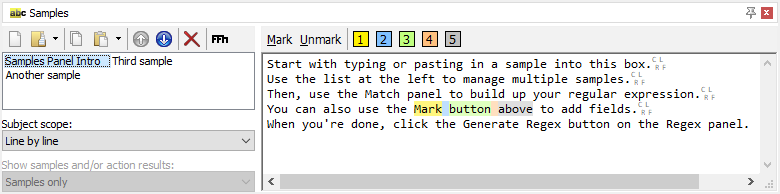
The screen shot shows the Samples panel holding three samples. The first one is selected. Five different fields have been marked in that sample.
For RegexMagic to be able to do any auto-detection at all, you need to provide at least one sample text. This is the first thing to do when you want to create a new regular expression with RegexMagic. You can provide as many samples as you want, by adding them to the list at the left hand side of the Samples panel. Though you can generate a regular expression with just one sample, it’s a good idea to test your regular expression on a representative sample of the input it will have to deal with, before letting it loose on your actual data.
Toggle the selected sample between text mode and hexadecimal mode.
In hexadecimal mode, RegexMagic's regular expression engine matches bytes rather than characters. This is appropriate for testing regular expressions on 8-bit binary data.
If you want to test on a large number of short samples, you can load them as a single sample in the list above. Set the subject scope to treat each line or each page in each sample in the list above as a separate subject. RegexMagic will feed the separated subjects one after the other into its regex engine. One subject will never affect another.
There are two ways to build up a regular expression in RegexMagic. One way is to add fields on the Match panel. The other way is to mark fields on the Samples panel.
This section describes exactly how RegexMagic operates when you mark fields. If you’re new to RegexMagic, you may find this description incomprehensible. Instead, you should try out some of the examples. You’ll find that marking samples is quite intuitive with just a little bit of practice.
If you’re already familiar with RegexMagic and you want to learn exactly how the buttons on the Samples panel operate, read on. There are two basic ways to mark fields: adding New fields with the Mark button, and providing additional samples for existing fields with the colored buttons that appear once you’ve used the Mark button. Depending on which text you select and which buttons you click, RegexMagic can modify your regular expression in five ways in response to your commands. Click on the links in the text below to see screen shots.
To build up a regular expression by marking fields, select the first bit of text that the regular expression should match, and click the Mark button. The text you selected becomes highlighted in yellow, to indicate it is marked as field  . The field is added to the Match panel, where you can change its settings if you want.
To expand your regular expression, select a bit of text immediately after the first field and click the Mark button again. This tells RegexMagic to add field  right after the first one. Repeat this to add a third field or as many as you like.
Each time you click the Mark button, a new colored button appears above the sample text. Use these colored buttons when you want to mark additional sample text for an existing field, rather than add new fields as the Mark button does. E.g. if you’ve clicked the Mark button 3 times to mark one regex match that should consist of 3 fields, you can then use buttons , , and  to mark the text that should matched by the second regex match. You can continue selecting bits of text and clicking these 3 buttons to mark additional regex matches.
Whenever you mark more text as an existing field, RegexMagic refines the pattern for that field. Depending on the text you’re working with, it may be easier to mark more text on the Samples panel to refine the pattern than to manually configure the pattern on the Match panel.
When you use the colored buttons to mark additional samples, it’s your responsibility to do so in a consistent manner. If your regex consists of 3 pattern fields, then you always need to mark the fields , , and in that order. RegexMagic can’t adapt your regular expression if you contradict yourself.
If you don’t mark the fields adjacent and in order, RegexMagic tries to be clever about how it adds the new field to your regular expression. If you select some text and mark it, that becomes field . If you then select some non-adjacent text and click the Mark button, the previously marked text becomes field , and the newly marked text becomes field . Both will be inside an alternation field that has no marked text. The alternation field allows your regular expression to match either the pattern selected for field , or the pattern selected for field . When using such a regex with a “find all” command, it will find both pieces of text that you marked. If you were to use the Mark button on any more pieces of text not adjacent to anything you’ve marked, those would become additional alternatives  ,
,  ,
,  , etc. under the alternation field .
If use use the Mark button twice to mark two adjacent bits of text, you get a regex with two pattern fields and . Suppose you then use button to mark a bit of text that’s not adjacent to the text you just marked. Then you select a bit of text adjacent to the text marked with button and click the Mark button. In this case, the Mark button will not mark the text as field . Had that been what you wanted, you should have clicked button instead of the Mark button. The colored buttons add samples to existing fields. The Mark button always adds a new field.
So you’re marking a brand new field immediately adjacent to field . This tells RegexMagic that your regex should either match field followed by field (the first sample you marked), or it should match field followed by the new field. To accomplish this, RegexMagic rearranges your regular expression. Field stays as it is. Field becomes an alternation field. The original field is renumbered to and becomes the first alternative under field . The newly marked text becomes field , as the second alternative under field .
Continuing from the example in the previous section, suppose you select some text immediately adjacent to the text marked as field and click the Mark button. This tells RegexMagic that the regex should match the new field immediately after field . But that field is inside the alternation field , so RegexMagic can’t just stick the new field at the end of your regex. It needs to specify that field consists of two alternatives. The first alternative is field , and the second alternative consists of two fields: field followed by the newly marked field.
To do this, RegexMagic changes field into a sequence field, and the old field becomes field and the first field in the sequence. The newly marked field becomes field and the second field in the sequence.
When you’re done marking fields on the Samples panel, you’ll continue on the Match panel to specify more accurately how those fields should be matched. Then you’ll go to the Action panel to tell RegexMagic to capture or replace certain fields. When you’re done with the Samples, Match, and Action panels, you’ll generate your regular expression on the Regex panel.
Finally, you’ll complete the circle by coming back to the Samples panel. The highlighting will have changed. After generating your regular expression, the highlighting indicates the text actually matched by each field.
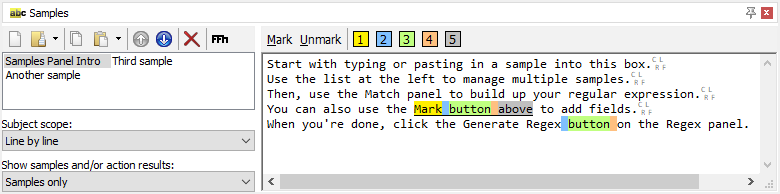
The five fields that were marked are now highlighted with more intense colors. Intense colors indicate that the regular expression actually matched that part of the text, and the color indicates which field actually matched the text. Muted colors as in the screen shot at the top of this page indicate text that you marked as a certain field, but that was not matched by the regular expression at all.
The five fields that were marked are also underlined. Underlining indicates that the text was matched by the same field that you marked the text for. Fields , , and are highlighted a second time, without underlining. That indicates the regular expression found a match for those fields in text that was not marked at all. If text is matched by a field different from the one you marked the text for, it will be highlighted using the color of the field that actually matched the text, but the text will be struck out to indicate it was marked for a different field.
Highlighting the matches of the generated regular expression is done with a special regular expression engine that accurately emulates the syntax and behavior of all the applications that RegexMagic can generate regular expressions for. You can trust that the generated regular expression will find the exact same matches in your actual application as indicated by RegexMagic.
This assumes, of course, that you’ve correctly transferred the generated regex from RegexMagic to your actual application. The easiest way to do that is via the source code snippets that RegexMagic generates on the Use panel. The generated snippet automatically uses the correct string format for the regex and automatically sets all matching modes. If you copy and paste the regex from the Regex panel then you have to make sure that you also set the matching modes indicated on the Regex panel.
It also assumes that the sample text you’re using in RegexMagic is the same text your actual application works on and that the “subject scope” setting corresponds with the way your application handles that text. When the scope is set to “whole sample” line breaks can make things a little tricky. Windows text files normally use CRLF line breaks. Linux and OS X use UNIX-style LF only line breaks. Classic Mac used CR only for line breaks. All editor controls in RegexMagic handle all these line break styles, as well as all other Unicode line breaks even though they are not commonly used in plain text files.
Most regular expression engines are not so smart, however. Many recognize only the line feed as a line break character. This mainly affects the “begin regex match at” and “end regex match at” settings on the Match panel when you set them to “start of line” and “end of line”.
In many cases, you’ll never notice this. For example, the regex engines in Perl, Python, and Ruby only recognize LF as a line break. Yet, when you read a Windows text file in its entirety into a variable in any of these languages, regexes set to match at the start and end of a line work just fine. The reason is that these languages open files in “text mode” by default. In this mode, when your script runs on Windows, reading from a file automatically converts CRLF line breaks into LF only, and writing to a file automatically does the opposite conversion.
To make it easier to test your regular expression, RegexMagic automatically converts line breaks in your samples to fit the regex engine of the selected application each time you generate the regular expression. If you generate a regex for Perl, Python, or Ruby, then line breaks in your samples are automatically converted to LF only.
In most situations you don’t need to worry about this because most regex engines handle line breaks in a way that is consistent with what the overall environment does. One major exception among the applications supported by RegexMagic are the applications and programming languages based on the .NET framework. Since .NET is a Windows development library, you’ll most likely be reading text files with Windows line breaks. The .NET classes for reading files do not do any line break conversion. But the .NET Regex class treats only the line feed character as a line break. This means that if you have a string that contains CRLF line breaks, then a regex set to match at the end of a line will not find the correct matches or any matches at all because the end-of-line anchor will try to match between the CR and the LF instead of before the CRLF.
Because the .NET Regex class only supports line feeds and because RegexMagic emulates only regex engines rather than complete programming languages, RegexMagic converts the line break style of your samples to LF only when you generate a regex for .NET. To match up the behavior between RegexMagic and your .NET application, you’ll need to do the same conversion in your .NET application by replacing all matches of the literal string "\r" with nothing.
If your regex doesn’t need to find matches that span multiple lines, then a less confusing solution may be to make your .NET application read files one line at a time, and pass each line separately to the regex. You can make RegexMagic do the same by selecting “line by line” as the subject scope. This way your subject strings will never contain any line breaks, so you don’t need to worry how your regex deals with them.
)
)
)
)
)
)
)