The Regex panel is where you have RegexMagic generate your regular expression, and possibly a replacement text, according to your specifications on the Match and Action panels.
In the default layout and the dual monitor tabbed layout, the Regex panel is docked together under a tab with the Use panel. Click the “Regex, Use” tab near the top of the RegexMagic window to activate the Regex panel. In both side by side layouts, the Regex panel is permanently visible.
Press Alt+5 on the keyboard to move keyboard focus to the Regex panel, and to make it visible if it was hidden. Or, select the Regex item in the View menu. You can access that menu by the View button on the Assistant panel, and by right-clicking on the caption or tab of any panel in RegexMagic.
The good news about regular expressions is that you can use them with a wide variety of applications and programming languages. The bad news is that the developers of each regular expression engine (the software component that executes your regular expressions) has their own idea of what the regex syntax should be. That has resulted in a wide range of regular expression flavors. Though many claim to the “Perl compatible”, there are significant differences between most flavors.
Fortunately, you have RegexMagic to generate your regular expressions for you. All you need to do is to select the correct application in RegexMagic. RegexMagic supports 292 different applications and programming languages. The number is so large because RegexMagic supports many different versions of the same applications. This ensures that you get the same results when testing the generated regular expression in RegexMagic as when using it in your actual application.
If your application needs to work with multiple applications or multiple versions of the same application, select the primary application or version in the drop-down list and click the Compare button to select all your target applications for comparison.
Select “More applications and languages” at the top of the list or press Alt+F1 on the keyboard to show a dialog box with the complete list of predefined applications and languages. The ones you tick in the dialog box are the favorites shown directly in the drop-down list. The built-in applications cannot be edited or deleted. But you can edit their associated source code templates.
An “application” in RegexMagic is a group of five settings:
When adding custom applications, you are limited to selecting predefined regex, replacement, and split flavors. Because the flavor definitions are very complex, you cannot create your own. You can select them in combinations that were not previously used in any application. If you’re working with an application or programming language that uses a regex, replacement, or split flavor that is different from any of the flavors supported by RegexMagic, you can let us know as a feature request for future versions of RegexMagic.
Most regular expression flavors support several regular expression matching options or modes that affect things like case sensitivity and line break handling. These options are traditionally set outside the regular expression. In an application, these can often be set using toggle buttons. In programming languages, these modes are set using flags at the end of a regex literal, or as an extra parameter to functions that take a regular expression as a parameter.
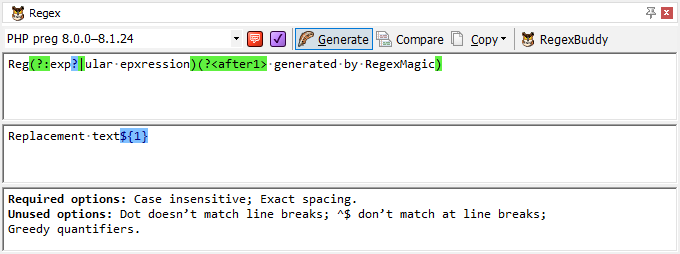
In RegexMagic, these options appear on the Regex panel. Free-spacing mode is available via the  button that you can press before generating the regular expression. You choose whether your regex is free-spacing or not. The other options appear as labels at the bottom of the panel. Required options must be set when using the generated regex to make sure you’ll get the same results as in RegexMagic. The options are always indicated with positive labels, such as “case sensitive” or “case insensitive”. In your actual application you may need to turn off the opposite option if it only has one option as an on/off toggle. For example, if your application has a “case insensitive” option, then you need to turn that off when RegexMagic indicates “case sensitive” is required. Turn it on when RegexMagic indicates “case insensitive” is required.
For completeness, RegexMagic also indicates unused options. These are options that your regular expression flavor allows to be toggled, but that do not affect the regular expression generated by RegexMagic. The labels are the default states for the unused options.
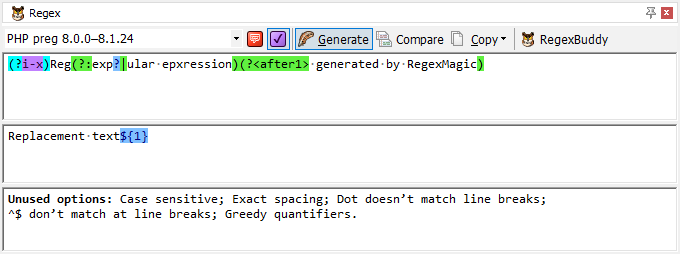
If you generate source code snippets on the Use panel, RegexMagic automatically sets the matching modes in the source code snippets. If you copy and paste your regex, you need to set the matching modes yourself. Or, you can include the matching modes into the regular expression itself by turning on the  button, as the screen shot shows.
Free-spacing mode ignores whitespace and # comments in the regular expression. Most modern regex flavors support this.
Click the red button with the text balloon to turn on free-spacing mode. This is recommended. RegexMagic then adds comments to your regular expression, making it easier to remember what it does later.
If you turn on free-spacing mode in RegexMagic, but you don't turn on the Modifiers button, then you need to make sure to also turn on free-spacing mode in the application or programming language you're working with. If the Modifiers button is turned on, your regex will begin with (?x) to activate free-spacing mode.
Turn on the Modifiers button (purple button with a tick mark) to place mode modifiers at the start of the regular expression to set the dot matches newline, case insensitive and ^$ match at line breaks matching modes. This results in a self-contained regular expression that doesn't depend on external options.
Only modern regex flavors support mode modifiers. When the Modifiers button is disabled, or you turned it off, you need to use whatever mechanism your application or programming library provides to set the matching modes your regular expression needs. RegexMagic indicates this in the bottommost box on the Regex panel. The list of "required options" are the options that your regular expression depends on. You have to turn them on to make your regex work as RegexMagic indented. For completeness, RegexMagic also indicates the remaining options that the application supports as "unused options". Turning unused options on or off will not affect your regular expression.
After selecting the application and toggling the and buttons as needed, click Generate button to generate your regular expression following your specifications on the Match panel. If you specified a replacement action on the Action panel, the Generate button generates a replacement text too. If the regular expression can’t be generated for some reason, the RegexMagic Assistant tells you why.
Once clicked, the Generate button stays down until you click it again. While the button is down, RegexMagic will automatically regenerate your regular expression and replacement text each time you change something on the Match or Action panel. If the regular expression can’t be generated for some reason, nothing will be displayed until you correct the error. To see the error message in the Assistant, click the Generate button again, even if it is already down.
It’s tempting to just hit Ctrl+A and Ctrl+C to select the regular expression you just generated, and copy it to the clipboard. That will work if you plan to paste it into an application that provides a box to paste a regular expression in, such as the Search boxes in EditPad Pro or PowerGREP. But you’re making your life difficult if you plan to paste your regex “as is” into your source code.
Instead, click the Copy button on the Regex toolbar. RegexMagic presents you with a long list of programming language string styles to choose from. Select the string style you need in your source code, and RegexMagic will properly format your regex as a string, escaping characters that have a special meaning in strings in your programming language. The topic Copying and Pasting Regexes in this help file has all the details.