The Match panel is the place where you tell RegexMagic which parts of the text you want your regular expression to match, and what that text should look like or which patterns that text should fit. Together, the Samples, Match, and Action panels define a RegexMagic formula to generate a regular expression, and possibly a replacement text.
In the default layout, the Match panel shares the top left tab with the Samples and Action panels. Depending on which panel you last used, that tab will say “Samples, Match” or “Samples, Action”. Click that tab, and then on the Match tab inside it, to activate the Match panel in the default layout. In the side by side layout, the Match and Action panels are combined into one tab labeled “Match, Action”. Clicking that tab shows both panels. In the dual monitor tabbed layout, the Match panel has its own tab in RegexMagic’s main window. In the dual monitor side by side layout, the Match panel is always visible in the main window.
Press Alt+3 on the keyboard to move keyboard focus to the Match panel, and to make it visible if it was hidden. Or, select the Match item in the View menu. You can access that menu by the View button on the Assistant panel, and by right-clicking on the caption or tab of any panel in RegexMagic.
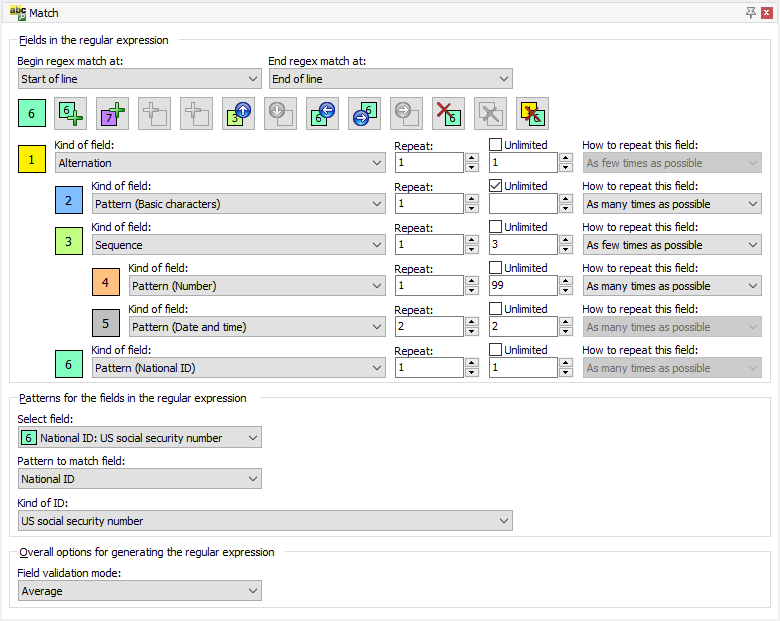
There are two ways to build up a regular expression in RegexMagic. One way is to mark fields on the Samples panel. The other way is to add fields on the Match panel using the row of 12 buttons. These 12 buttons operate on or relative to the selected field. The colored rectangle to the left of the 12 buttons indicates the selected field. In the large screen shot above, field  is selected. To select another field, click on the colored rectangle to the left of the field’s “kind of field” drop-down list. Clicking on field
  , for example, changes the row of buttons to this:
![]()
Different buttons are now enabled. Their glyphs have changed to indicate that they now operate on or relative to field instead of field . The function of each of the 12 buttons is always the same. The examples given in the explanation assume you have six fields on the Match pattern as shown in the above screen shot. When an explanation for the same button has multiple examples, all the examples start from the original six fields. There are no consecutive examples. It will help to understand the explanations if you have already tried the examples that use pattern fields, sequence fields, and alternation fields.
selected,  adds a new field between fields
  and . The new field will get number . The old fields through will have their numbers shifted by one to
  through
  . If you did not yet add any fields then this button appears as
  . Clicking it adds the first field. selected,
  adds a new field . The new field will be part of the alternation under field
  , just like field . The new field will not be part of the sequence under field . The old field will have its number shifted to . selected,
  adds a new field . The new field becomes the first field in the sequence under field , just like the old field . The old fields through will have their numbers incremented by one. selected,
  adds a new field . The new field becomes the first field in the sequence under field , just like the old field . The old fields through will have their numbers incremented by one. selected,
  moves the whole sequence through
  upwards, changing their numbers to through . The original field ends up below (but not part of) the sequence with its number changed to . With field selected,
  moves field up and over field . Field has its number changed to , and fields to have their numbers changed to through . This button is always disabled for field . It is also disabled for all fields that are the first field under an alternation or sequence field. In the example, it is disabled for fields and . selected,
  does exactly the same as what does with field selected. With field selected,
  does exactly the same as what does with field selected. This button is disabled for all fields that are the last field under an alternation or sequence field. In the example, it is disabled for fields , , and . selected in the example,
  puts field above field . The numbers of these two fields will be swapped. With field selected as in the screen shot,
  moves that field to the left so it is no longer part of the alternation under field . is selected. Then
  moves field into the sequence under field that precedes it. It will be the last field in the sequence and will keep its number. If field were an alternation or sequence field too, then all the fields under it would move along with it. is selected. Then
  moves field into the sequence under field that precedes it. It will be the first field in the sequence. The numbers of fields and will be swapped. Fields and will remain a part of the sequence. If field were an alternation or sequence field too, then all the fields under it would move along with it, and their numbers would be shifted accordingly. is selected in the example,
  deletes only field . Fields and are automatically moved to the left into the alternation under field . Fields through will have their field numbers decremented by one. is selected in the example,
  deletes fields through . Field will be renumbered to .
 deletes all the fields in the example. Because “begin/end regex match at” are set to “start/end of line”, this would leave you with a regular expression that matches only blank lines.
 Specify at which position(s) in the text the regular expression match(es) may begin.
To make the regular expression begin with something else, such as a certain word, select "anywhere" as the starting position. Then select the text at which the regular expression should begin in the sample text, and click button above the sample text to mark it as the first field.
Specify at which position(s) in the text the regular expression match(es) must end.
Select what kind of field you want to add to the regular expression here.
If you change a pattern field to become an alternation or sequence field, then one field is added to the alternation or sequence. The new field will use the same pattern with the same settings that the changed field used.
If you change an alternation field or sequence field to become a pattern field, then it will use the pattern from the first pattern field inside the alternation or sequence. All fields that were inside the alternation or sequence will be deleted.
Specify how many times this field can or should be repeated.
Use the left hand spinner box to set the minimum number of times the field should be matched. If you set the minimum to zero, the field becomes optional.
Use the right hand spinner box to set the maximum number of times the field can be repeated. If you don't want to specify a specific upper limit, tick the "unlimited" checkbox.
Repeating a pattern field allows the pattern to be matched multiple times, and find a different match each time. If your field has a pattern that matches any single letter, and you repeat that field 3 times, then your regular expression can match ABC, XYZ, or any other 3-letter combination.
Repeating an alternation repeats the alternation as a whole. A different field from the alternation can match with each repetition. If you have an alternation with 3 fields that match A, B, and C, then repeating that alternation 4 times allows your regular expression to match AAAA, ABCA, BCAA, or any other 4-letter combination of A, B, and/or C.
Repeating a sequence repeats the sequence as a whole. If you have a sequence with 3 fields that match A, B, and C, then repeating that sequence 4 times makes your regex search for ABCABCABCABC.
Choose in which way you want the field to be repeated.
For each field listed on the Match panel as a “pattern” field, you can select which pattern the field should have. The pattern specifies what kind of text the field should match: a date, a number, an email address, etc. All the patterns provide various options to restrict the acceptable values. E.g. the “number” pattern allows you to limit the numbers your regex will match to a certain range, require or disallow decimals, etc.
In the screen shot of the Match panel, the “basic characters” pattern was selected for field , the “number” pattern was selected for field , the “date and time” pattern for field , and the “national ID” pattern for field . Field is selected in the “select field” drop-down list, allowing its pattern to be edited. The “pattern to match field” drop-down list is always present, allowing you to choose a completely different pattern for that field. Below that list you can configure the pattern. For the “national ID” pattern, there is only one drop-down list labeled “kind of ID” that allows you to choose a particular national ID such as a US social security number.
To edit the pattern of another field, use the “select field” drop-down list. Only pattern fields appear in this list. You can also click on the colored squares to the left of the settings for each pattern field to edit that field’s pattern. Clicking the colored square of an alternation or sequence selects the pattern of the first pattern field inside the alternation or sequence.
When creating a regular expression, there is always a trade-off between, on one hand, making the regular expression match exactly what you want but not what you don't want, and on the other hand, keeping the regular expression fast and simple. If you know the data to be valid, you can use a fast and loose regex. If some of the data may be invalid, and you can't use programming logic to filter the regex matches, a strict and complex regex may be appropriate.
In RegexMagic, the field validation mode determines how tightly the generated regular expression will correspond with the patterns that you have configured for each of the fields.
The exact effects of these four modes are indicated in the RegexMagic Assistant's hints for each of the various settings you can make for each of the patterns. If an option's does not indicate that it works differently for any of the modes, that means the Strict, Average, and Loose modes all respect the option strictly. Since the None mode always builds just one character class per field, that is not specifically indicated in the hints.