RegexMagic makes it easy to generate source code snippets for all of the world’s most popular programming languages. Each language template implements a comprehensive set of functions, or things that you can do with your regular expression in the selected programming language.
If the provided functions don’t match your coding style, you can easily edit any of the templates by clicking the Edit button on the toolbar on the Use tab. You can edit or delete the provided functions, and add as many new functions as you like.
You can also create new templates. These can be alternative sets of functions for a programming language already supported by RegexMagic, such as a set of functions specific to a particular development project. You can also create templates for languages not supported by RegexMagic. The only limitation is that you’ll be limited to languages that use one of the regex flavors and string styles already supported by RegexMagic.
The RegexMagic Source Code Template Editor appears when you click the Edit button on the toolbar on the Use tab. To start with a fresh template, click the New button. To open an existing template, click the Open button and select the template from the drop-down list. Click the Save button to save your modified template, overwriting the existing template. Click the Save As button to save the template under a new name, so both the original and the modified template will be available.
Templates that ship with RegexMagic are stored in the same folder as RegexMagic itself. The default installation folder is “C:\Program Files\JGsoft\RegexMagic”. Templates that you save are always saved under the “Application Data\RegexMagic 3” folder under your Windows user profile. If two templates with the same file name exist in both folders, only the template in your user folder will be used. The effect is that if you open a template included with RegexMagic and save it with the same name, only the modified template will be available in RegexMagic, but the original template will still be available on disk.
On the General tab in the template editor, you’ll be asked to set the general properties of the language you’re creating a template for. You should also enter your contact details, in case you want to share your template on RegexMagic’s user forums.
Language: Enter the name of the programming language the template is for. You can also specify a more descriptive purpose if you’re creating an alternative template for a language that already has a template. This name will appear in the Language drop-down list on the Use tab.
Regex and replacement flavor: Select the regular expression flavor and the replacement text flavor used by the language. The available replacement text flavors depend on the regular expression flavor that you selected. It is not possible to define your own flavors. The flavor you select is the target flavor that RegexMagic will use when converting your regular expression.
String style: Select the kind of string or operator that the language uses to specify literal regular expressions in source code. The %REGEX% and %REPLACEMENT% placeholders will insert the regular expression and replacement text into the generated source code snippet after formatting it using the string style you select here. This way, RegexMagic automatically takes care of placing quotes around the string and escaping quotes and backslashes in the regex, or whatever the selected string style requires. The available string styles are the same ones available via the Copy and Paste buttons on RegexMagic’s main toolbar.
Syntax coloring scheme: Select the syntax coloring scheme that RegexMagic should use to highlight keywords, comments, strings, etc. when displaying your source code snippet on the Use tab. This only affects how your code snippets are displayed in RegexMagic. It does not alter the code snippet. The highlighting is not copied over when you copy your code snippet to the clipboard. Click the Download button to download coloring schemes shared by other RegexMagic users. Click the Edit button to edit the selected syntax coloring scheme with the syntax coloring scheme editor. The editor is an external application that licensed RegexMagic users can download for free from the EditPad Pro web site. (RegexMagic uses the same syntax coloring system as EditPad Pro.)
Single-line comment delimiter: Enter the character or characters that start a comment that runs until the end of the line in the language you’re creating the template for. Leave this box blank if the language doesn’t support single-line comments.
Multi-line comment delimiters: In the box at the left, enter the character or characters that begin a multi-line comment. In the box at the right, enter the characters that end a multi-line comment. Leave both boxes blank if the language doesn’t support multi-line comments.
You have to specify either the single-line comment delimiter or the multi-line comment delimiter pair for RegexMagic to be able to add conversion warnings to the generated source code snippet, and for the “comment with RegexMagic’s regex tree” function to be available. If your language supports both single-line and multi-line comments, please specify both styles. RegexMagic will then choose the comment style best suited for each situation.
Region delimiters: If your programming language supports the concept of regions, enter the compiler directive that starts the region in the box at the left, and the directive that ends the region in the box at the right. If your language allows regions to be named, you should include a name such as “RegexMagic” or “regular expression tree” in the region delimiters. When you specify region delimiters, the function “comment inside a region with RegexMagic’s regex tree” will automatically become available for your language.
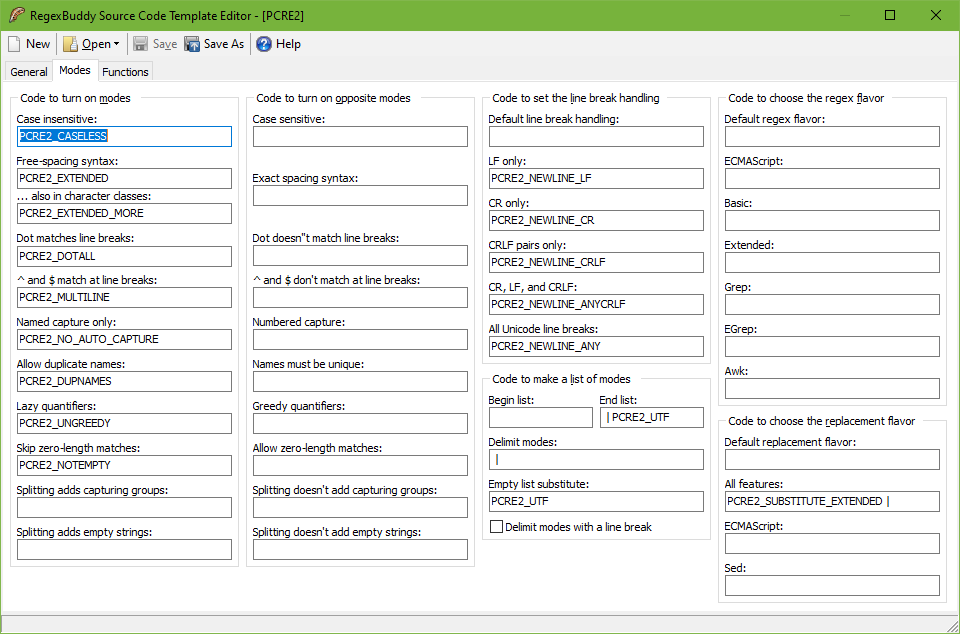
On the Modes tab in the template editor, you’ll need to specify the code that RegexMagic needs to use to make sure your code snippet uses the same matching modes as RegexMagic itself. The labels on the Modes tab correspond with the labels on the mode buttons in RegexMagic’s toolbar.
What you specify on the Modes tab is not automatically inserted into the source code snippets. Rather, the code you specify for each mode is used to build up the placeholders %MODELIST%, %DOTALL%, %CASELESS%, %MULTILINE% and %FREESPACING%. The %MODELIST% placeholder combines the code from “code to turn on modes” or from “code to turn off modes” (depending on whether the mode is on or off) for each mode as specified in the “code to make a list of modes” section. The other four placeholders simply insert the code from “code to turn on modes” or from “code to turn off modes”, depending on whether the mode is on or off.
Code to turn on modes: For modes that are off by default in your language, you should specify the code that turns them on. Leave the code blank for modes that are on by default, or that your programming language does not provide an option for. If the code to set a mode needs to reference a variable or object that you want to be dynamic, you can use one of the %PARAM1% through %PARAM4% placeholders in the code to turn on the mode.
Code to turn off modes: Use this instead of “code to turn on modes” for modes that are on by default in your language. If your language requires the mode to be set whether it’s on or off (i.e. there’s no default), then you can specify both the “on” and “off” code for the mode.
Code to make a list of modes: If you want to use the %MODELIST% placeholder in your code snippets to insert all modes together in one spot, you can specify how RegexMagic should build that list. If you leave all the boxes blank and the checkbox off, RegexMagic will simply concatenate all the modes without any spacing between them. In the “begin list” and “end list” boxes you can specify which code, if any, RegexMagic should place at the start or the end of the list. The begin and end code is only used if the list contains at least one mode. In the “delimit modes” box, you can type the characters that RegexMagic should place between two modes. If you want the delimiter to include a line break, turn on the line break checkbox. The delimiter is only used if the list contains two or more modes. In the “empty list substitute” box you can type the code that %MODELIST% should insert when all modes are set to their defaults (i.e. all the relevant code to turn modes on and off is blank).
If your language’s regex flavor supports a particular mode via a mode modifier inside the regular expression, but the language or library doesn’t support it via a flag or property that you can set in your application’s source code (other than using the mode modifier), then you should leave both the “code to turn on modes” and “code to turn off modes” blank for that mode. When both these are blank, RegexMagic will automatically insert the mode modifier for that mode at the start of the regular expression to turn the mode on or off, as necessary.
E.g. in REALbasic, “dot matches newlines” is off by default, and “case insensitive” and “^ and $ match at line breaks” are on by default. It takes a whole line of code to toggle them. “Free-spacing” syntax is supported by the PCRE flavor used by REALbasic, but REALbasic doesn’t provide an option for it. If you generate a REALbasic snippet with the free-spacing option turned on, RegexMagic will automatically prepend the mode modifier to your regular expression to make it work with REALbasic.
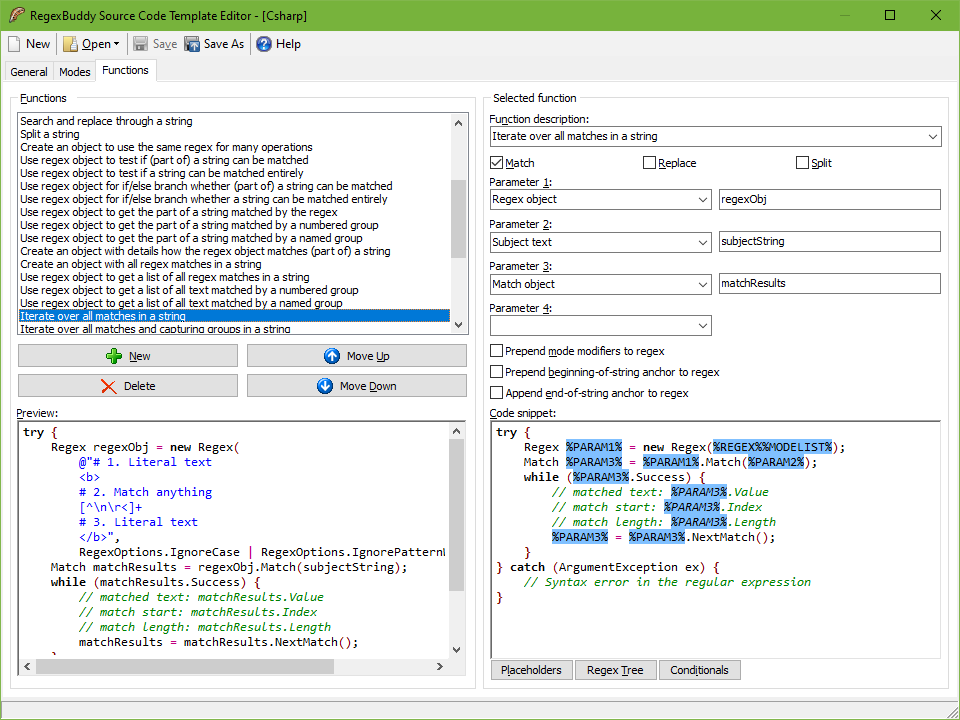
The Functions tab is where the real action is. Here, you’ll define all the functions that will appear in the Functions drop-down list on the Use tab when your template is selected.
To add a function, click the New button. The first function you add will be blank. The next function you add will automatically take over everything from the selected function, except its description. This way you can easily create different variants of a particular function.
The order in which the functions are listed in the template editor is also the order they’ll have in RegexMagic. RegexMagic doesn’t sort them alphabetically. You should put related functions next to each other. You can rearrange the functions with the Move Up and Move Down buttons. You can delete functions with the Delete button.
The function’s description is the label it will have on the Use tab in RegexMagic. The Function Description drop-down list in the template editor lists all the function descriptions in all other RegexMagic source code templates that you haven’t used yet in the template you’re editing now. This way you can easily make your function descriptions consistent between various templates. It’s also a handy reminder of the functions your template doesn’t support yet. Of course, you can always enter a new function description. If you then edit another template, the new description will also appear in the drop-down list.
The Match, Replace and Split checkboxes determine for which kinds of actions the function will be available on the Use panel. Since a comprehensive template will have a lot of functions, you can reduce clutter by restricting functions to the kinds of actions that they perform.
Each function can have up to four parameters that the user of your template can provide. You should use these parameters for your code snippet’s input and output variables. Such variable names tend to change whenever a code snippet is used. Allowing the variable name to be set in RegexMagic before the snippet is generated is easier than changing it after pasting the snippet into your source code editor.
For each parameter, you can specify a label in the drop-down list at the left, and a default value at the right. The drop-down list will show all function labels that you’ve already used in this template. If you select a parameter from the drop-down list, RegexMagic will also set the default value you previously set for that parameter. If you change the default value, it will change throughout the current template for all parameters with the same label. There is no limit to the number of different parameters you can use in a language template. However, each function can use only four.
Using three checkboxes you can specify if RegexMagic should modify the regular expression before inserting it into the function’s source code. Turn on “prepend mode modifiers to regex” if you want RegexMagic to put mode modifiers for all the matching modes at the start of the regex. As explained in the above section about modes, RegexMagic normally only prepends the mode modifiers for those modes for which you did neither specify “turn on” nor “turn off” code. If your programming language has certain regular expression functions that allow modes to be set in source code, while others don’t (leaving mode modifiers as the only way), you should turn on the “prepend mode modifiers to regex” for those functions that don’t. For the functions that do, you’ll use placeholders like %MODELIST%. Note that some regex flavors, like JavaScript, POSIX and XML don’t support mode modifiers. For these flavors, the “prepend mode modifiers” checkbox will have no effect.
There’s a difference between checking if a regular expression matches part of a string, versus checking if it matches the whole string. Some programming languages have separate routines for these two tasks. Other languages don’t have a special method to check if a regex matches a string entirely. For those languages, you can create a function that checks if a regex matches a string entirely by turning on the options to prepend and append an anchor. RegexMagic automatically uses the anchors appropriate for your language’s regular expression flavor.
Finally, you’ll need to enter the actual code snippet. The box in the lower right corner is where you enter your snippet using placeholders. RegexMagic will show a preview of the source code it will generate in the lower left corner. The preview uses the regular expression and options you used in RegexMagic before opening the source code template editor.
You can insert placeholders by typing them in, or by clicking the Placeholders button and selecting one from the list. The following placeholders are available:
You can also use conditionals to include certain code in your snippet only under certain circumstances. This is particularly useful to create snippets that call functions with optional parameters. For example, typing “%IFSPLITLIMIT%, %SPLITLIMIT%%ENDIFSPLITLIMIT%” will insert a comma, space and the split limit only when the split limit is not blank. The following conditionals are available: